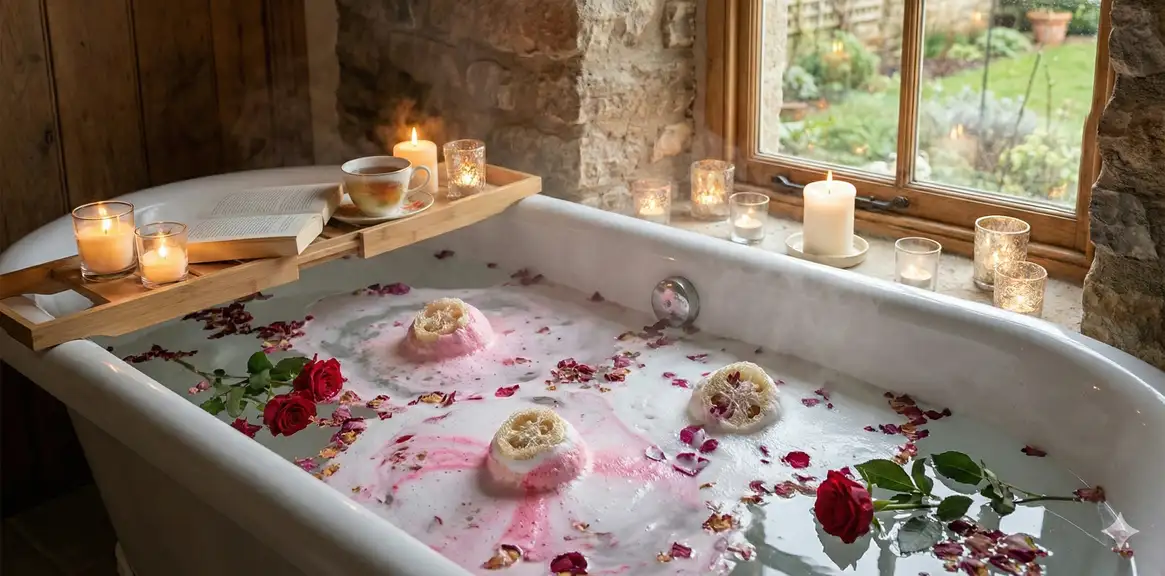
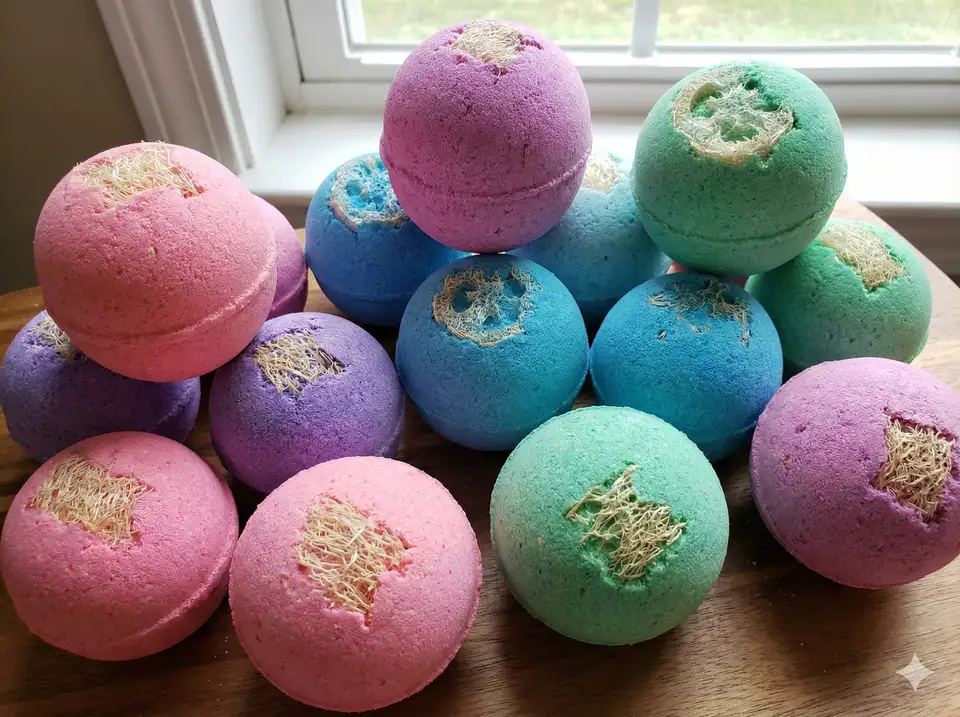
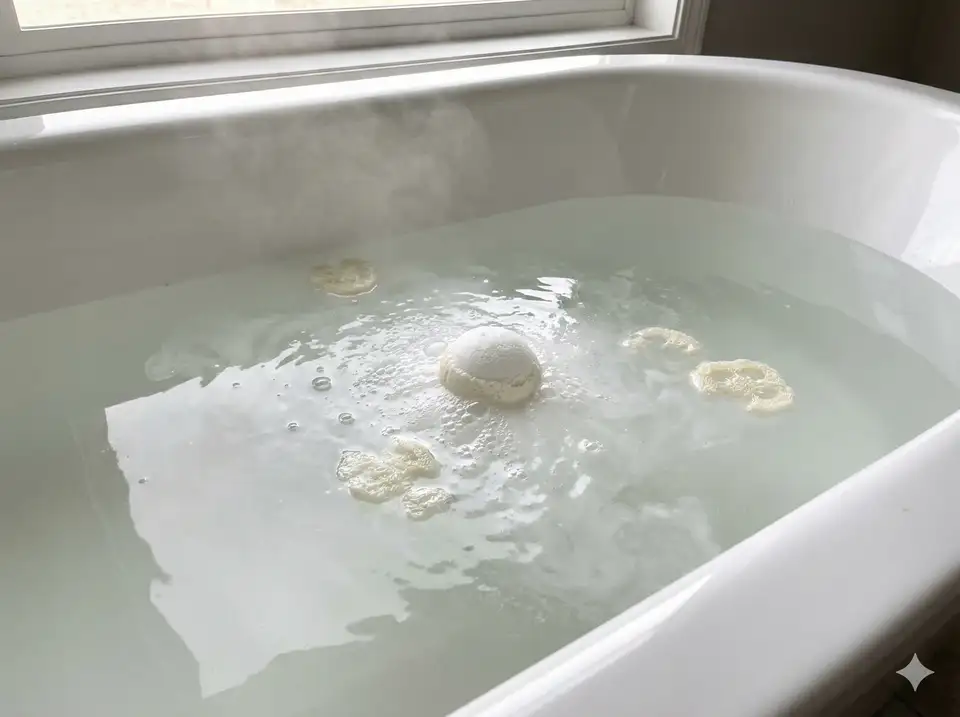
Bath bombs have become a beloved self-care staple, transforming ordinary baths into luxurious spa experiences. By adding loofah pieces to your DIY bath bombs, you create a two-in-one product that fizzes beautifully while providing natural exfoliation. Whether you're making them for yourself or as thoughtful handmade gifts, loofah bath bombs are surprisingly easy to create at home and make a wonderful addition to any DIY bath products collection.
This comprehensive guide covers everything you need to know about making exfoliating bath bombs with loofah, from selecting the right ingredients to troubleshooting common issues. If you enjoy bath product crafting, you'll find that bath bombs use similar techniques with different chemistry. You'll learn professional techniques that ensure your bath bombs hold together perfectly and deliver a satisfying fizz every time.
Essential Supplies for Loofah Bath Bombs
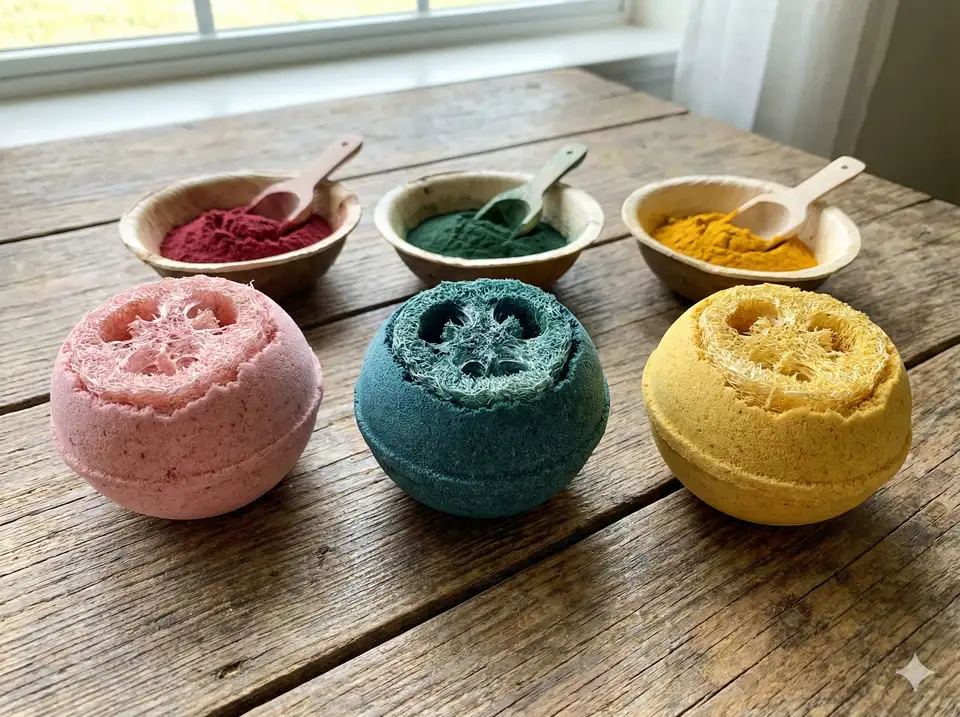
Before diving into the creative process, gather all your materials. Having everything prepared and measured makes the process smoother and helps prevent the mixture from activating prematurely.
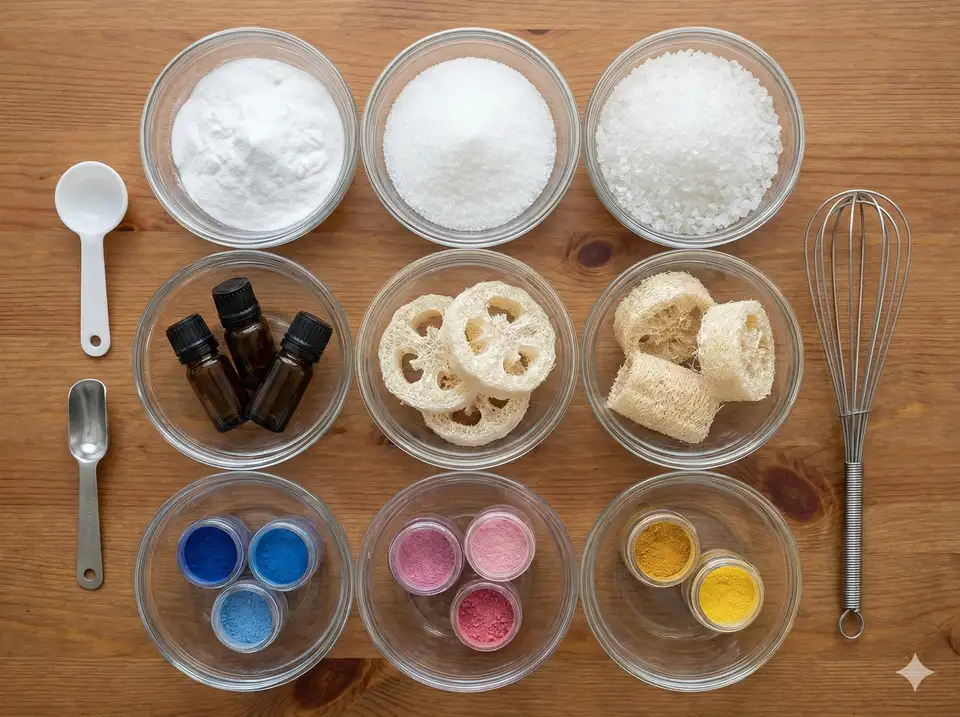
- Baking soda (sodium bicarbonate): 1 cup - Creates the fizzing reaction
- Citric acid: 1/2 cup - Works with baking soda to produce fizz
- Cornstarch: 1/2 cup - Acts as a binder and makes bath water silky
- Epsom salt: 1/2 cup - Adds soothing properties and weight
- Carrier oil: 2 tablespoons - Sweet almond, coconut, or jojoba oil
- Essential oils: 10-15 drops - Your choice of scent
- Water or witch hazel: In spray bottle - For adjusting consistency
- Food coloring: Optional - A few drops for color
- Dried loofah pieces: Cut into 1-2 inch sections
- Bath bomb molds: Metal, plastic, or silicone molds
- Mixing bowls: Glass or stainless steel (non-reactive)
- Whisk or sifter: For removing lumps
Basic DIY Bath Bomb Recipe with Loofah
This classic recipe makes 4-6 medium bath bombs with embedded loofah for gentle exfoliation during your soak.
Ingredients:
- 1 cup baking soda
- 1/2 cup citric acid
- 1/2 cup cornstarch
- 1/2 cup Epsom salt
- 2 tablespoons sweet almond oil
- 10-15 drops lavender essential oil
- 3-4 small loofah pieces
- Natural food coloring (optional)
Instructions:
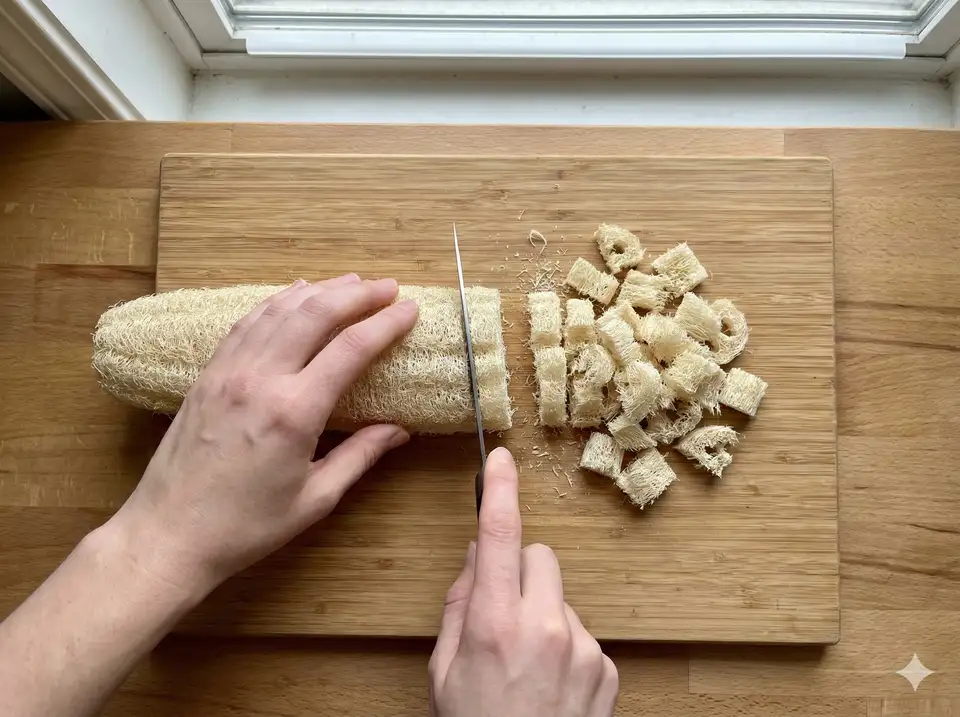
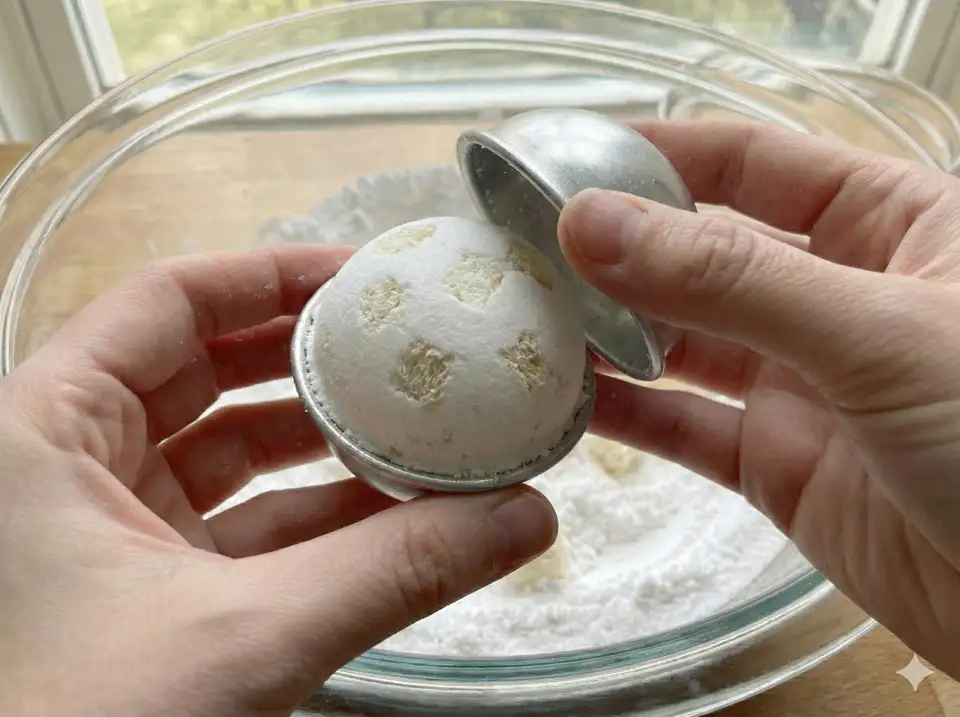
- Prepare loofah: Cut dried loofah into 1-2 inch pieces. If very dry, briefly soak in water to soften, then pat completely dry.
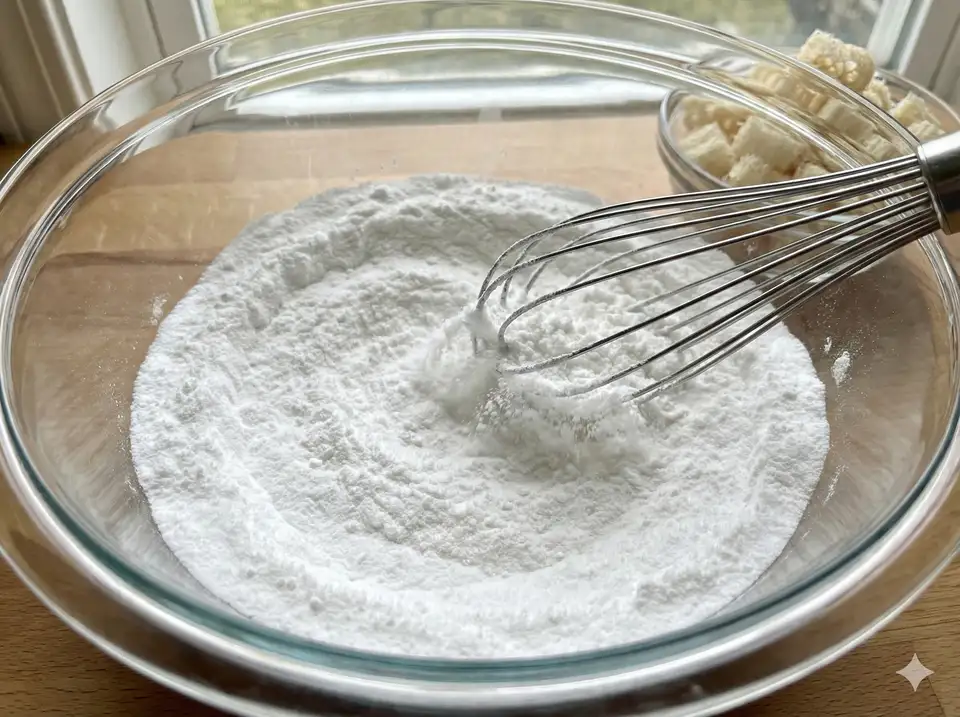
- Mix dry ingredients: In a large bowl, combine baking soda, citric acid, cornstarch, and Epsom salt. Whisk thoroughly to break up any clumps.
- Combine wet ingredients: In a small bowl, mix carrier oil and essential oils. Add food coloring if using.
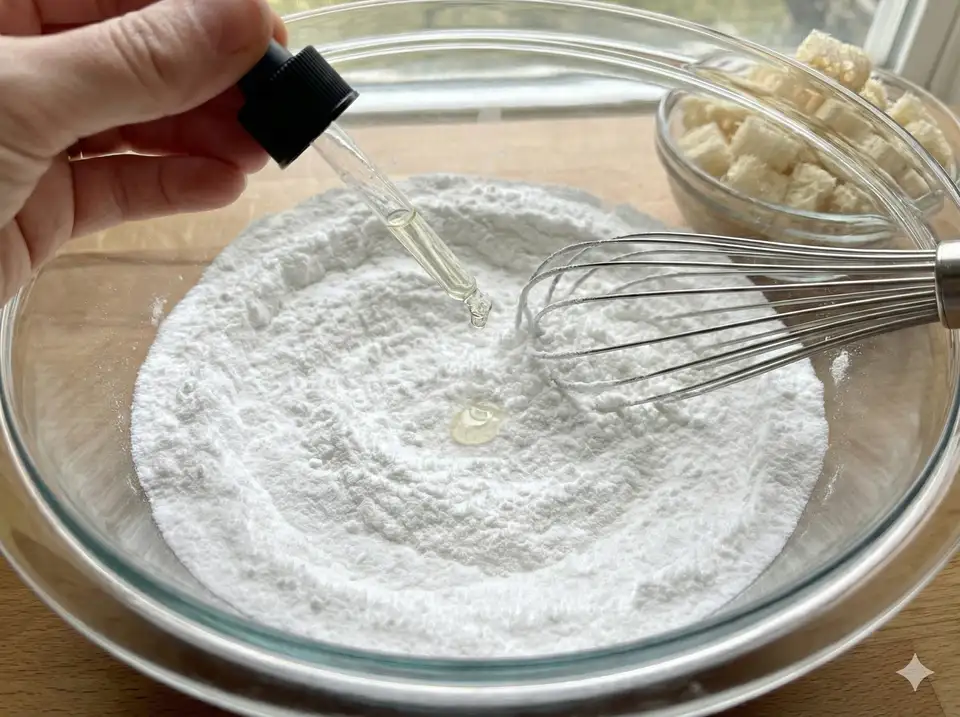
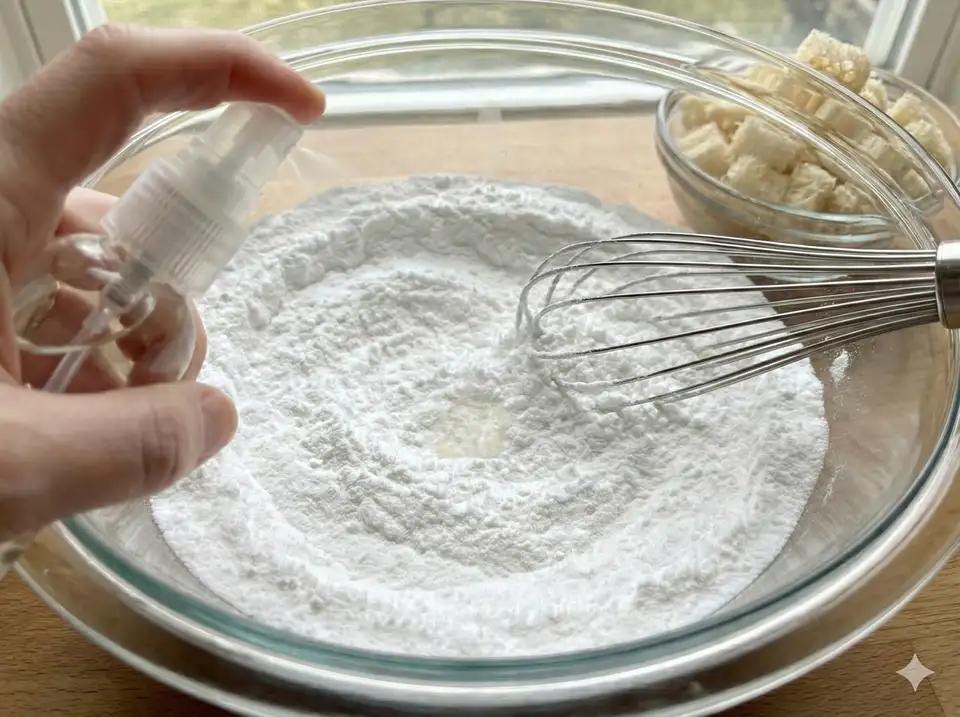
- Bring it together: Slowly drizzle wet ingredients into dry ingredients while mixing constantly. The mixture should feel like damp sand.
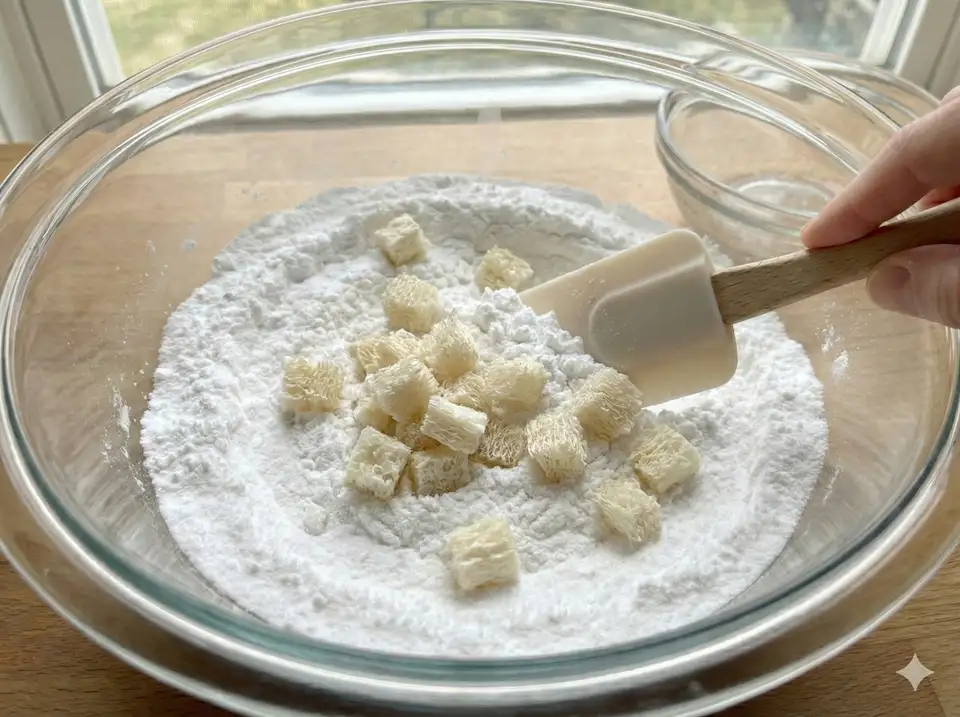
- Add loofah: Fold in loofah pieces, distributing them evenly throughout the mixture.
- Pack into molds: Firmly pack the mixture into your molds, pressing loofah pieces so they're embedded. Overfill slightly and press both halves together.
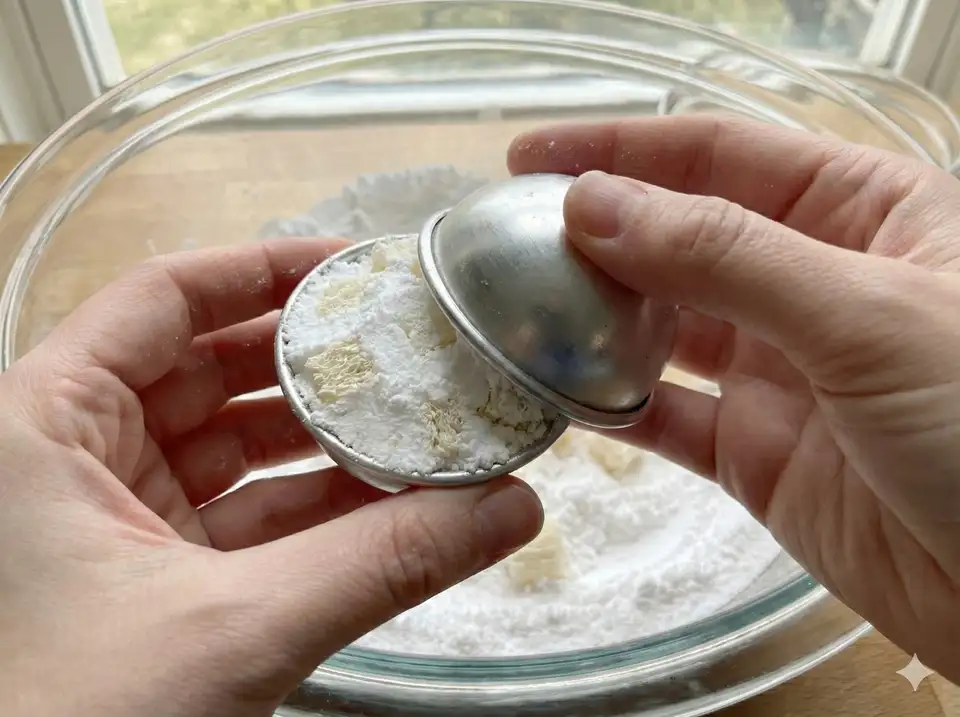
- Unmold carefully: Let sit for 5 minutes, then gently tap molds to release. Place on parchment paper.
- Dry completely: Allow to dry for 24-48 hours in a cool, dry location before using or packaging.

- Work quickly once you add wet to dry ingredients to prevent premature fizzing
- Use a spray bottle for water/witch hazel to add moisture gradually and evenly
- Test consistency by squeezing a handful - it should hold together without crumbling
- Pack mixture very firmly into molds for best results
- Avoid making bath bombs on humid days as moisture can affect the mixture
Recommended Bath Bomb Supplies
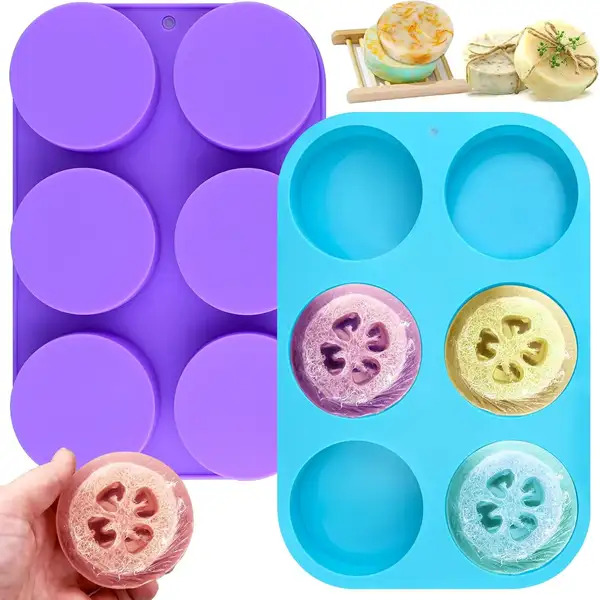
Sakolla Round Silicone Soap Molds for Loofah Slices (2-Pack)
Round silicone molds specifically designed for loofah soap making. Perfect for creating circular loofah soap bars that fit loofah slices perfectly.
Check Price on Amazon
PURA D'OR Organic Essential Oils Set (16 Scents)
Complete aromatherapy set with 16 USDA organic essential oils including lavender, eucalyptus, and tea tree. Perfect for scenting loofah soap and bath bombs.
Check Price on AmazonAs an Amazon Associate, we earn from qualifying purchases.
How to Properly Embed Loofah in Bath Bombs
The key to successful loofah bath bombs lies in properly embedding the loofah pieces so they stay secure while allowing the bath bomb to fizz and dissolve correctly.
Preparing Your Loofah
Start with dried loofah that's been properly processed. Young loofah works better than mature loofah for bath bombs because it's softer and more pliable. Cut your loofah into pieces no larger than 2 inches - small pieces distribute better throughout the bath bomb and provide better exfoliation during use.
If your loofah pieces are very stiff, you can briefly soak them in water for 5-10 minutes to make them more flexible. However, make absolutely certain they're completely dry before adding to your bath bomb mixture, as any excess moisture will trigger the fizzing reaction prematurely.
Embedding Techniques
There are several methods for incorporating loofah into your bath bombs:
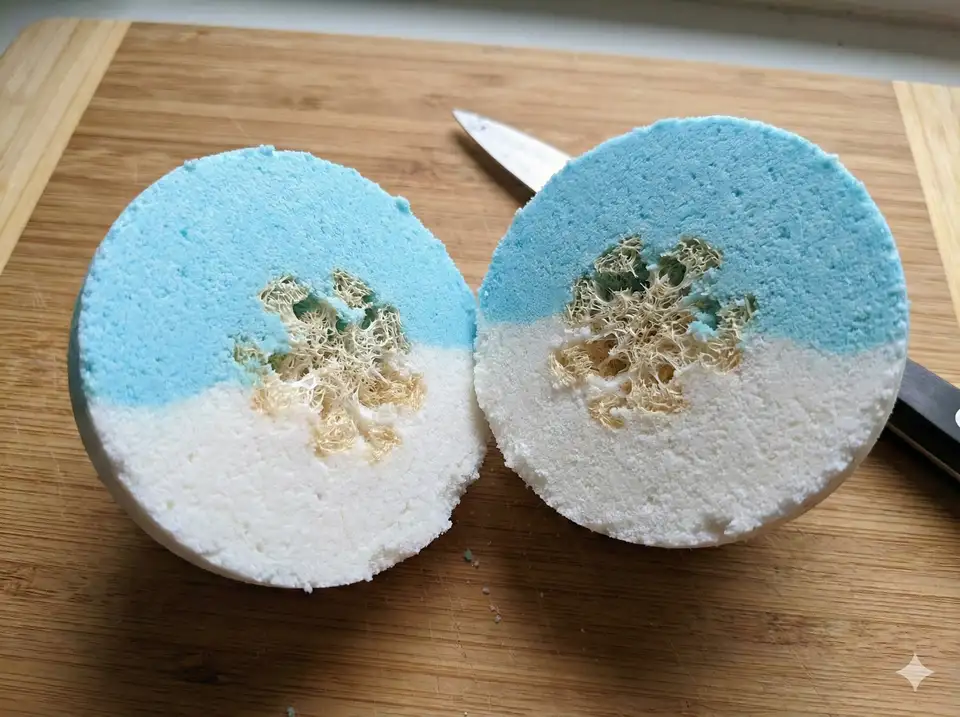
- Mixed throughout: The simplest method - fold loofah pieces into your mixture before molding. This creates an even distribution of exfoliating texture.
- Center placement: Pack half your mold with mixture, place a loofah piece in the center, then pack the remaining mixture. This creates a surprise element when the bath bomb dissolves.
- Surface decoration: Press small loofah pieces into the surface of packed bath bombs for visual appeal and immediate exfoliation access.
- Layered effect: Create layers of colored mixture with loofah pieces between each layer for a beautiful cross-section.
- Too large: Loofah pieces over 2 inches can prevent proper molding and may stick out awkwardly
- Too small: Tiny pieces lose their exfoliating effectiveness and may dissolve too quickly
- Just right: 1-2 inch pieces provide perfect exfoliation while embedding securely
- Consider thickness: Thin loofah slices work better than thick chunks for even distribution
Essential Oil Blends and Scent Options
The fragrance of your bath bombs can transform your bathing experience. Essential oils provide natural scents while offering aromatherapy benefits. These bath bombs fit perfectly into a sustainable bath products routine since all ingredients are natural and biodegradable.
- Lavender Dreams: 10 drops lavender + 5 drops chamomile
- Peaceful Evening: 8 drops lavender + 4 drops ylang ylang + 3 drops bergamot
- Zen Garden: 7 drops lavender + 5 drops sandalwood + 3 drops frankincense
- Citrus Burst: 7 drops sweet orange + 5 drops lemon + 3 drops grapefruit
- Morning Mint: 8 drops peppermint + 7 drops eucalyptus
- Tropical Energy: 8 drops lime + 4 drops grapefruit + 3 drops lemongrass
- Eucalyptus Mint: 10 drops eucalyptus + 5 drops spearmint
- Rose Garden: 8 drops rose absolute + 4 drops geranium + 3 drops palmarosa
- Herbal Retreat: 7 drops rosemary + 5 drops lavender + 3 drops thyme
When working with essential oils, use 10-15 drops total per batch. Start with fewer drops and add more if needed - it's easier to add fragrance than to dilute an overpowering scent. Always use pure essential oils rather than fragrance oils for the best therapeutic benefits.
Bath Bomb Mold Types and Alternatives
While professional bath bomb molds create perfect spheres, many household items work beautifully for creating unique shapes and sizes.
Professional Molds
- Metal sphere molds: The gold standard - create perfect round bath bombs with a smooth finish. Two-piece design makes unmolding easy.
- Plastic sphere molds: More affordable than metal, work well but may not create as tight a seal.
- Silicone molds: Available in countless shapes from hearts to stars. Flexible material makes unmolding very easy but may require firmer packing.
Household Alternatives
- Muffin tins: Create large cupcake-shaped bath bombs. Silicone muffin cups work best for easy removal.
- Ice cube trays: Perfect for making mini bath bombs or bath melts.
- Measuring cups: Metal measuring cups work as molds for dome-shaped bath bombs.
- Cookie cutters: Create flat bath bomb shapes by packing mixture into cutters placed on a flat surface.
- Hand-formed: Simply pack mixture into a ball shape using your hands - creates rustic, artisanal-looking bath bombs.
Proper Drying and Curing Process
The drying phase is just as important as the mixing and molding process. Properly cured bath bombs hold together better, fizz more vigorously, and have a longer shelf life.
Initial Drying (24-48 hours)
After unmolding, place bath bombs on parchment paper or a wire cooling rack in a cool, dry location. Avoid direct sunlight, which can fade colors and degrade essential oils. Good airflow is important - don't stack bath bombs or place them too close together.
Extended Curing (24-72 hours)
For best results, allow bath bombs to cure for an additional 24-72 hours after they seem dry. This extended curing time allows the ingredients to fully bind together, creating a harder, more durable bath bomb that fizzes better.
- Storing too early: Placing bath bombs in containers before fully dry can cause them to soften or stick together
- Humid environments: High humidity can prevent proper drying and may even cause bath bombs to expand or crack
- Refrigerator drying: While it seems logical, refrigerators introduce moisture that can ruin bath bombs
- Rushing the process: Trying to use bath bombs before they're fully cured results in weak fizzing and crumbling
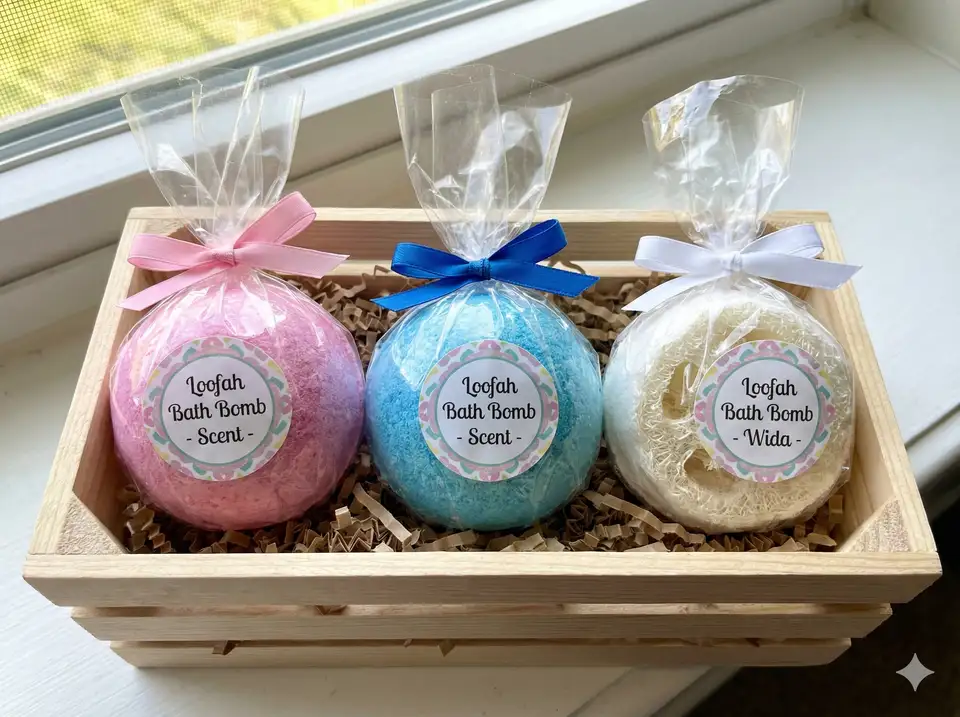
Creative Packaging for Gift-Giving
Loofah bath bombs make wonderful handmade gifts for birthdays, holidays, teacher appreciation, or self-care gift baskets. Consider including them in bath bomb gift sets alongside other natural bath products. Thoughtful packaging elevates your homemade creations from simple bath products to professional-looking presents.
Individual Wrapping Options
- Shrink wrap bags: Create a professional, retail look. Add a decorative label with ingredients and scent information.
- Cellophane wrap: Gather at the top and tie with raffia, ribbon, or twine. Clear wrapping showcases the bath bomb's colors and embedded loofah.
- Tissue paper: Wrap like a wrapped candy with twisted ends. Use colors that complement your bath bomb.
- Organza bags: Elegant and reusable. Choose bags slightly larger than your bath bombs for easy insertion.
Gift Set Presentations
Bath bombs pair beautifully with other items for complete gift presentations. Try adding them to a spa gift basket addition with loofah sponges, handmade soaps, and natural scrubs for an impressive spa-themed gift.
- Mason jars: Stack 2-3 smaller bath bombs in decorative jars. Add dried flowers or Epsom salts for visual appeal.
- Gift boxes: Line with tissue paper and nestle bath bombs with matching soaps, washcloths, or candles.
- Spa baskets: Combine bath bombs with other loofah products for a complete exfoliating spa set.
- Test tube packaging: For cylindrical or small bath bombs, clear test tubes with cork stoppers create a unique presentation.
Troubleshooting Common Bath Bomb Problems
Even experienced bath bomb makers encounter issues. Here's how to identify and fix the most common problems.
Causes:
- Mixture too dry - not enough liquid added
- Mixture not packed firmly enough into molds
- Unmolded too soon before setting
- Low humidity in work area making mixture dry out too quickly
Solutions:
- Add liquid gradually using a spray bottle until mixture holds together
- Pack mixture much more firmly - use significant pressure
- Wait at least 10 minutes before unmolding
- Work in a slightly humid environment or cover bowl between batches
Causes:
- Too much moisture added to mixture
- Mixture activated by liquid before fully molded
- High humidity in drying environment
Solutions:
- Add liquid more slowly and in smaller amounts
- Mix wet ingredients thoroughly before adding to dry
- Dry in a low-humidity space with good airflow
- Consider using witch hazel instead of water (evaporates faster)
Causes:
- Old baking soda or citric acid
- Incorrect ratio of baking soda to citric acid
- Too much oil or additives coating the fizzing ingredients
Solutions:
- Use fresh ingredients from sealed containers
- Maintain 2:1 ratio of baking soda to citric acid
- Reduce oil amount slightly if fizzing seems weak
Selling Your Loofah Bath Bombs
If your bath bombs turn out beautifully, you might consider turning your hobby into a small business. Many crafters have success selling bath products at farmers markets, craft fairs, and online shops. Bath bombs with embedded loofah have a unique selling point - they combine two popular bath products into one.
Key considerations for selling:
- Labeling requirements: Most regions require ingredient lists, weight, and business contact information
- Shelf life: Clearly communicate that bath bombs last 3-6 months
- Unique branding: The embedded loofah makes your product stand out from regular bath bombs
- Pricing: Factor in ingredients, packaging, time, and market positioning
Frequently Asked Questions
Yes, you can use regular dried loofah in bath bombs. Cut your loofah into small pieces (about 1-2 inches) before embedding them in the mixture. Young, thin loofah works best as it's softer and more flexible than mature loofah. Make sure the loofah is completely dry before adding to your bath bomb mixture to prevent premature activation.
When stored properly in an airtight container away from moisture and humidity, loofah bath bombs can last 3-6 months. Keep them in a cool, dry place and wrap individually in plastic wrap or cellophane for best results. After 6 months, the essential oils will begin to fade and the fizzing action may weaken.
Popular essential oils for bath bombs include lavender (relaxing), eucalyptus (invigorating), peppermint (energizing), citrus blends (uplifting), and tea tree (purifying). Use 10-15 drops per batch and combine complementary scents for custom blends. Avoid oils that irritate skin, especially if using the embedded loofah for exfoliation.
No, you don't need special molds. While bath bomb molds create perfect spheres, you can use silicone muffin tins, ice cube trays, or even pack the mixture by hand into balls. Metal molds work best for traditional round bath bombs, but many household items create beautiful alternative shapes.
Bath bombs crumble when the mixture is too dry or doesn't have enough binding agent. Add liquid slowly (using a spray bottle works best) until the mixture feels like damp sand and holds together when squeezed. Also ensure you pack the mixture firmly into molds and let them dry for the full 24-48 hours before handling.