
Yellow leaves are one of the most common concerns for loofah growers, and for good reason—they're often the first visible sign that something is wrong. But here's the tricky part: yellow leaves can indicate many different problems, from simple overwatering to serious nutrient deficiencies. Understanding proper plant care is essential for prevention.
The key to fixing yellow leaves is reading the pattern. Where the yellowing appears, how it spreads, and what other symptoms accompany it all point to specific causes.
Recommended Growing Supplies
KVITER Heirloom Luffa Seeds (40 Count)
Fast-sprouting non-GMO seeds with 90%+ germination - grow your own natural sponges in one season
Buy on Amazon
BN-LINK Seedling Heat Mat for Faster Germination
Cuts loofah germination time in half - waterproof design maintains optimal 75-85°F soil temperature
Buy on AmazonAs an Amazon Associate, we earn from qualifying purchases.
Quick Diagnosis Tool
Answer these questions to quickly identify the most likely cause:
Which leaves are turning yellow?
- Bottom/older leaves only: Nitrogen deficiency, natural aging, or overwatering
- Top/newer leaves: Iron deficiency or transplant shock
- Random leaves throughout: Disease or pest damage
What does the yellowing pattern look like?
- Entire leaf turns yellow: Overwatering, natural aging
- Yellow between veins (veins stay green): Iron deficiency
- Yellow edges/tips: Underwatering, fertilizer burn
- Yellow spots or patches: Disease, sun scorch
How does the soil feel?
- Soggy/waterlogged: Overwatering is very likely
- Bone dry: Underwatering
- Moist but not wet: Likely nutrient issue or disease
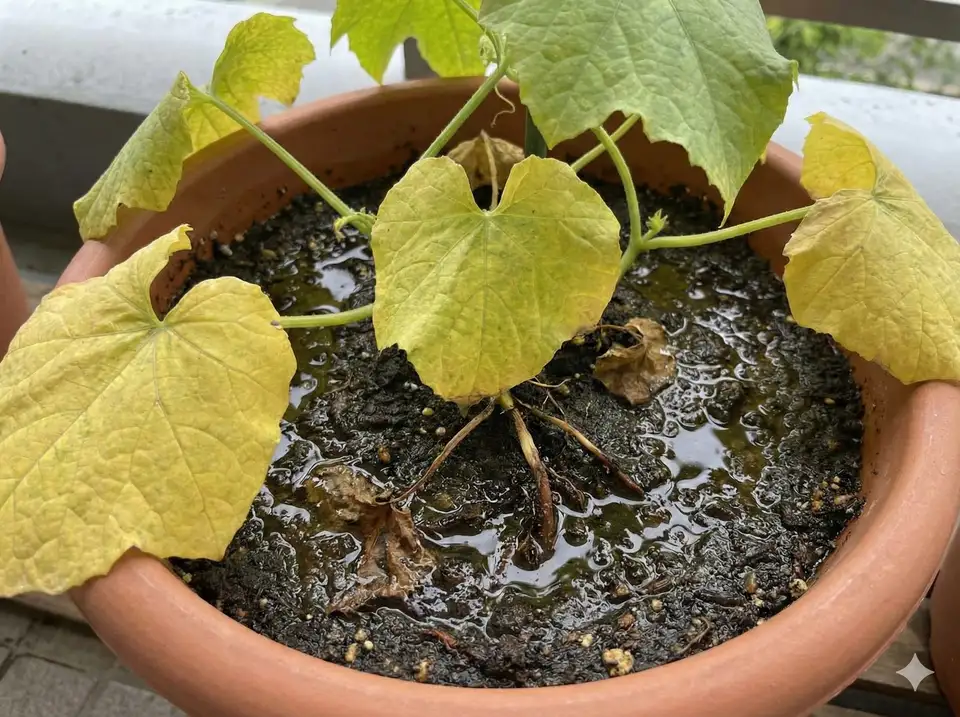
Cause 1: Overwatering (Most Common)
How to Identify
With overwatering, lower leaves turn uniformly yellow rather than developing patchy discoloration. The affected leaves feel soft, limp, or even mushy to the touch—very different from the crispy texture of underwatered leaves. Check the soil: if it stays wet for days after watering, that's a strong indicator. You may also notice stems feeling soft at the base, and in severe cases, there may be a musty or rotting smell coming from the soil.
Why This Happens: Waterlogged soil prevents roots from getting oxygen, causing them to suffocate and rot. Without healthy roots, the plant can't absorb nutrients, leading to yellowing. This is called "wet feet."
- Stop watering immediately and let soil dry out
- Check drainage—ensure pots have holes, amend heavy soil
- Only water when top 2 inches of soil are dry
- Remove any rotted roots if visible (brown, mushy)
- Consider adding perlite or sand to improve drainage
Cause 2: Underwatering / Drought Stress
How to Identify
Underwatering creates a distinctive pattern where leaf edges turn yellow first, then progress to crispy brown. Unlike overwatered leaves, these feel dry and papery. The plant often wilts noticeably during afternoon heat, recovering somewhat by morning. Check the soil—if it's dry several inches deep, drought stress is likely the culprit. You may also notice leaves curling inward as the plant tries to conserve what little moisture it has.
- Water deeply and thoroughly (not just surface)
- Apply 2-4 inches of mulch to retain moisture
- Water in early morning before heat
- Consider drip irrigation for consistent moisture
- Large loofahs need 1-2 inches of water per week
Cause 3: Nitrogen Deficiency (Very Common)
How to Identify
Nitrogen deficiency starts with the oldest leaves turning pale green before progressing to yellow. Unlike iron deficiency, the entire leaf yellows—including the veins eventually. The overall plant may appear stunted with smaller-than-normal leaves, and you'll notice a light green color throughout rather than the vibrant deep green of healthy loofah. New growth emerges looking pale and weak from the start.
Why This Happens: Nitrogen is mobile in plants, so when there's not enough, the plant moves nitrogen from older leaves to support new growth. This sacrifices the bottom leaves first. Loofah is a heavy feeder and depletes soil nitrogen quickly, especially during peak growth season. Learn more in our complete growing guide.
- Apply a balanced fertilizer (10-10-10) or nitrogen-rich option
- Side-dress with compost or aged manure
- Use fish emulsion for quick nitrogen boost
- Feed every 2-3 weeks during active growth
- Switch to bloom fertilizer once flowering begins
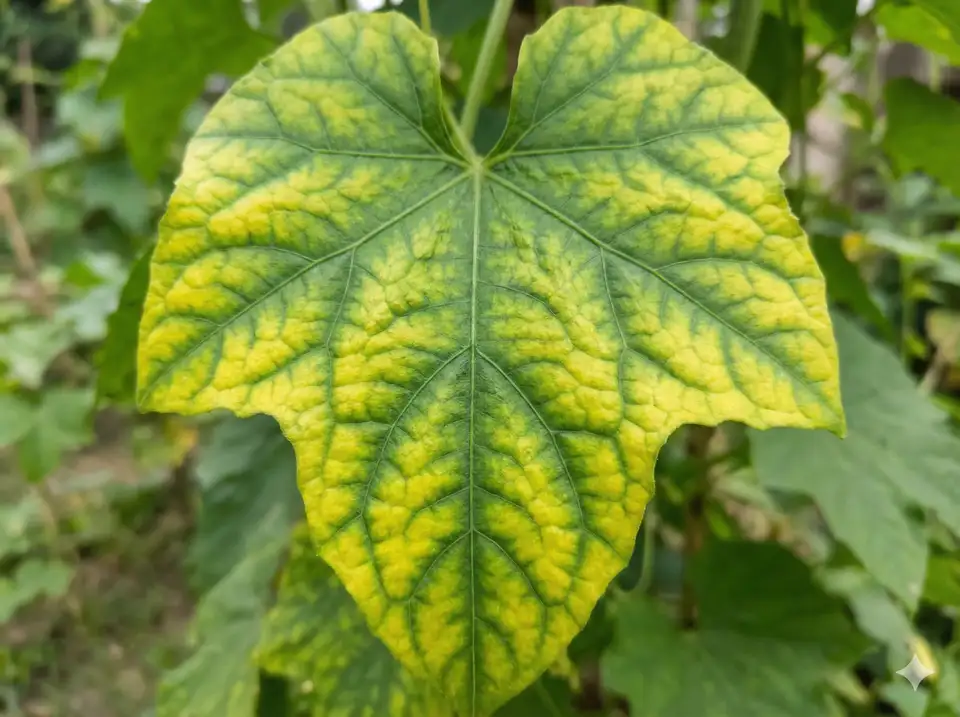
Cause 4: Iron Deficiency (Chlorosis)
How to Identify
Iron deficiency is the opposite of nitrogen deficiency—the new, young leaves at the top of the plant are affected first rather than old leaves. Look for the distinctive "interveinal chlorosis" pattern: yellow tissue between veins that remain green, creating a striking contrast. This problem often occurs in alkaline (high pH) soils and may affect only part of the plant initially.
Why This Happens: Iron isn't mobile in plants, so new growth shows symptoms first. Often the soil has iron, but high pH (above 7.0) locks it up so roots can't absorb it. This is common in areas with alkaline water or limestone soil.
- Test soil pH—loofah prefers 6.0-6.5
- Apply chelated iron (foliar spray works fastest)
- Lower soil pH with sulfur if too alkaline
- Add acidic amendments like peat moss
- Avoid over-liming the soil
Cause 5: Natural Leaf Aging (Normal)
How to Identify
Natural aging affects only the oldest leaves at the bottom of the plant while everything else looks healthy and continues growing vigorously. This typically occurs late in the season when the plant is putting energy into fruit production. The key differentiator is the gradual pace—only one or two leaves yellow at a time, and new growth at the top remains healthy and deep green. If your plant matches this description, you likely have nothing to worry about.
Why This Happens: As loofah plants mature and focus energy on fruit production, they naturally sacrifice older leaves. The plant reclaims nutrients from these leaves to support fruit development. This is completely normal, especially in late summer.
- Nothing—this is normal and healthy
- Remove yellowed leaves to improve air circulation
- Continue regular fertilizing to support fruit
- Only be concerned if yellowing is rapid or widespread
If more than 20-30% of leaves are yellowing at once, or if the yellowing is moving up the plant rapidly, it's likely more than natural aging. Check for other causes.

Cause 6: Fungal or Bacterial Disease
How to Identify
Disease-caused yellowing looks distinctly different from nutritional problems. Watch for yellow spots with brown or black centers, or angular yellow patches that follow leaf veins (characteristic of downy mildew). Powdery mildew shows as white powder on leaves accompanied by yellowing, while bacterial wilt causes sudden wilting along with yellowing. The biggest clue is the pattern: disease affects random leaves throughout the plant rather than following the predictable bottom-to-top or top-to-bottom progression of nutrient deficiencies.
- Remove affected leaves immediately
- Improve air circulation around plants
- Avoid overhead watering
- Apply fungicide or neem oil for organic solutions
- See our complete disease guide for detailed treatments
Cause 7: Pest Damage
How to Identify
Pest damage creates characteristic patterns depending on the culprit. Spider mites cause yellow stippling or speckling—tiny dots across the leaf surface—and leave fine webbing between leaves in severe infestations. Aphids create yellow spots accompanied by sticky honeydew residue on leaves below. In general, pest-related yellowing appears as patches concentrated around feeding damage. Always check leaf undersides where most pests hide; if you see tiny moving dots (mites) or clusters of soft-bodied insects (aphids), pests are your problem.
- Identify the pest (check leaf undersides)
- Spray with strong water stream to knock off pests
- Apply insecticidal soap or neem oil
- Introduce beneficial insects (ladybugs for aphids)
- See our pest guide for detailed treatments

Cause 8: Sun Scorch
How to Identify
Sun scorch creates bleached, pale yellow or white patches that look distinctly different from nutrient deficiencies. The key diagnostic feature is location: damage appears only on leaves facing direct afternoon sun, typically the upper and outer leaves most exposed to intense light. This commonly occurs after transplanting or moving plants from a sheltered location. The damaged areas can turn papery and brown quite quickly, sometimes within a day or two of the initial scorching.
Why This Happens: Plants moved from shade to full sun without gradual acclimation can get "sunburned." This is also common during extreme heat waves when even established plants can suffer sun damage.
- Provide temporary shade cloth during heat waves
- Harden off seedlings gradually before transplanting
- Ensure adequate watering during hot weather
- Damaged leaves won't recover but new growth will be fine
Cause 9: Transplant Shock (Temporary)
How to Identify
The timing is the biggest clue: transplant shock causes yellowing within one to two weeks of moving your plant to a new location. Lower leaves are most commonly affected, and the plant may wilt even when soil moisture is adequate. Growth often stalls temporarily as the plant redirects energy toward reestablishing its root system. If you recently transplanted and noticed root disturbance during the process, transplant shock is the most likely explanation for sudden yellowing.
- Be patient—most plants recover in 2-3 weeks
- Keep soil consistently moist (not waterlogged)
- Provide light shade for a few days after transplanting
- Avoid fertilizing until plant shows new growth
- Remove severely yellowed leaves to reduce stress
Quick Reference Chart
Use this chart to quickly identify the cause based on symptoms:
- Bottom leaves + whole leaf yellow + soft/limp: Overwatering
- Bottom leaves + whole leaf yellow + crispy: Nitrogen deficiency
- Leaf edges/tips + brown crispy edges: Underwatering
- Top/new leaves + yellow between green veins: Iron deficiency
- Random leaves + spots, patches, rings: Disease
- Sun-facing leaves + bleached white patches: Sun scorch
- Random leaves + tiny stippling dots: Spider mites
- Only oldest leaves + gradual + plant healthy: Natural aging